In the past, we set up Outlook archives so that email could be stored on the A&S file server and free up the limited space on the Exchange server. This was an imperfect system because the archive file type (.pst) doesn't perform very well on server storage, but if we moved the file to your local desktop's C drive, it might be lost in a hard drive crash or Windows reinstall.
Office 365 introduces an online archive feature that will allow you to access your archives from anywhere and doesn't have the corruption issues that we experience with PST files. This tutorial will walk you through the steps of moving your local archived emails into the online archive.
Please note: Depending on the size of your archive, this process can take anywhere from several minutes up to a day or more, and you will not be able to use Outlook on your office computer during this time. We recommend waiting until a weekend to start the transfer so that you can be out of the office while it runs. In the meantime, you can access your mailbox through the web access: outlook.office365.com
If you have moved anything into your archive recently, reboot your computer.
Changes in PST files aren't saved to the file server while the files are active (Outlook is running), so the safest way to ensure that Outlook is not running and that your PST is backed up properly is to restart your computer.
Before you begin, you'll want to check where in your files your PST file is actually stored.
The default location is in your Documents folder in a folder called "Outlook Files," but archives created in Outlook 2003 or 2007 had a different default location.
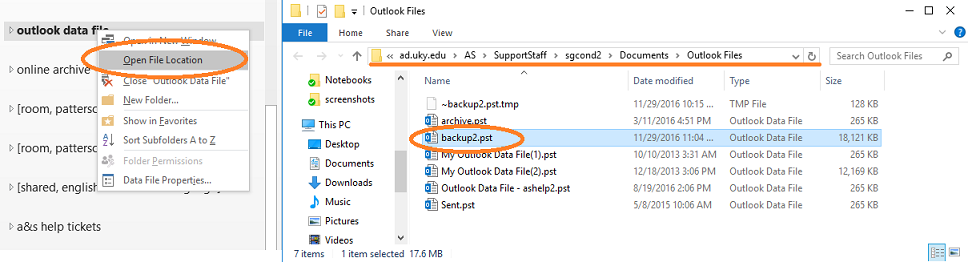
- Right-click on the archive that you are planning to transfer and choose Open File Location
- A file explorer window will open with the archive you chose highlighted. The location of the file is there in the address bar (you can just leave this window open and refer back to it later).
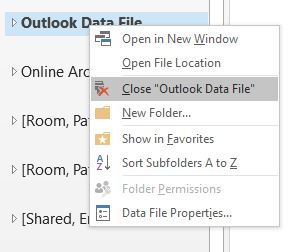
Close your archive folder by right-clicking on it and choosing Close.
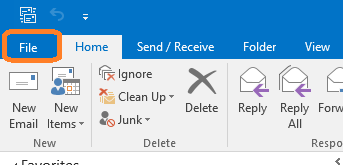
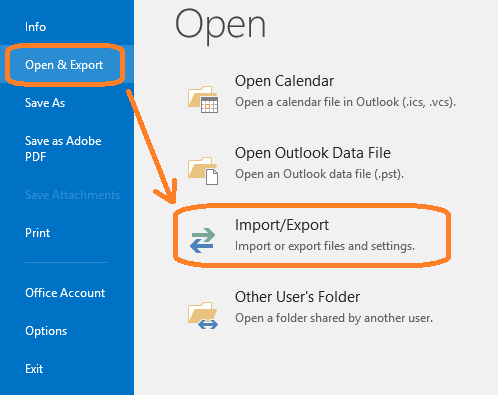
In Outlook, click on File tab.
Click on Open & Export and then choose Import/Export.
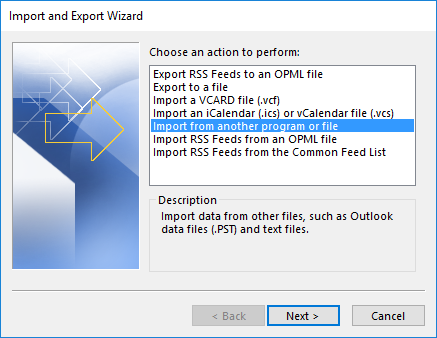
In the Import and Export Wizard, select "Import from another program or file" and click Next.
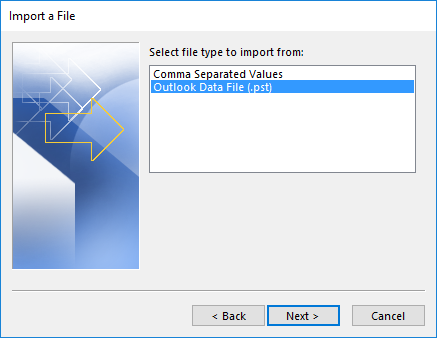
Choose Outlook Data File (.pst) and click Next.
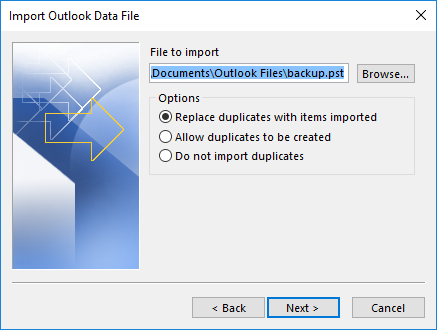
Click on Browse... to navigate to your archive location in step 2 and select your archive file. Hit next.
You don't need to change anything with the duplicates setting.
Check the settings on this window carefully before hitting Finish.
To import your entire archive, make sure the top-level file is highlighted and "Include subfolders" is checked. You can just select a certain folder (or set of subfolders) within your archive if you only want to move a subset of the archive.
By default, the setting for "Import items into the same folder in:" is set to your current UK inbox (for me, Sarah.Condley@uky.edu) . This will move all of your emails and folders back up into your active mailbox creating new folders and merging individual emails into folders with the same name. If you want to maintain an archive location that is separate from your UK inbox, choose the Online Archive associated with your UK email address.

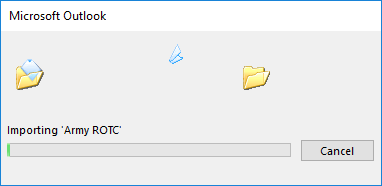
Your emails will begin copying to the server. Leave this running until it completes.
Outlook may say it's not responding from time to time, but it should still be working in the background. Lock your computer instead of logging out if the transfer is still running at the end of your day.